Welcome to XRHealth!
XRHealth is a comprehensive health platform used to connect hundreds of patients and clinicians through virtual reality without the extra hassle of security, compliance, and access management. This guide will help you get started with XRHealth API.
For access to our Sandbox. Please reach out to developers@xr.health to get a developer username and password so you can create an access token
XRHealth API will enable you to integrate your VR application into XR Health and allow you to:
- Make your application available in our Health Portal.
- Store session data on XRHealth servers
- Allow your users to track their results in the XRHealth web portal by providing a dashboard displaying their treatment progress
- Add our Treatment Plan feature to your application (Coming soon!)

Our API is organized around REST and has predictable resource-oriented URLs,
accepts form-encoded request bodies and returns JSON-encoded responses.
Sandbox API is accessible for integration and testing proper connection
between your application and our server for post-workout sessions' data and graphs requests.
Integrate XRHealth API in 3 steps:


Step 1: Prepare for deep link
In order to allow our users to open your application from within the Health Portal, your application start-up needs to be ready to process our deep-link call with the following JSON structure:
                            {

                                "access_token": "14klkjerj2343lkjr3l4",

                                "server_url": "https://api.portal.consumer-qa.xr.health/",

                                "patient_ID": "13"

                            }
- The "access_token" will be used for the Authorization Bearer access token - The token holds all the required information for the specific - logged- in user visiting your application.
- The "server_url" and “patient_ID” will be used for the POST API call. Once the session is uploaded correctly to our servers, it will be visible to the client in our web portal based on their patient_ID.
Step 2: Validate access token
Before sending any data to XRHealth, please validate your access_token, which will help ensure users are valid. If you have an existing login mechanism for your application, you’ll need to replace it with validate_access_token in order to allow users access to your application.
To validate the access_token, please use the curl -X GET "https://api.portal.consumer-dev.xr.health/api/sandbox/oauth/token/validate/{token}" request, with the required parameters.
Headers
Parameters
Example
                            curl -X GET "http://127.0.0.1:8000/api/sandbox/oauth/token/validate/
                            MmFmMDA4OGRiMzUxZmQ0NmRjMGNmYmZiOGFkMmM3MTcxM2IyYjRiMjYyMzBkODk5MjU4YjhmMGQwMWNjNmY5ZQ"


                             -H "accept: application/json"
Learn more about access_token validation and responses >
Step 3: Send Post-Workout Sessions Data
Now, once a user can open your application via deep-link (See step 1) and you have validated the access_token parameter (See step 2), you are ready to update our Health Portal with session data. Once a user finishes a session, you will need to update our Health Portal with the post-workout session data.
To update our Health Portal with post-workout session data, use a curl -X POST "https://api.portal.consumer-dev.xr.health/api/developer/workout-sessions" request, with the required parameters. [required parameters|Anchor to “New Workout Session“].
Headers
Parameters
Example
                            curl -X POST "https://api.portal.consumer-dev.xr.health/api/developer/workout-sessions"
                            \

                              -H "Content-type:\ application/x-www-form-urlencoded" \

                              -H "Authorization:\ Bearer\ accessToken" \

                              -d "duration=75" \

                              -d "epocStartTime=1561626806758" \

                              -d "score=5600" \

                              -d
                            "levelPlannedParams={\"SpeedLevel\":+\"0\",\"SessionDuration\":+\"8\",\"Difficulty\":+\"Basic\",\"GameMode\":+\"Enabled\"}"
                            \

                              -d "softwareVersion=1.1.0" \

                              -d "resultData={\"calculatedData\":+[{\"name\":+\"Score\",\"value\":+\"360\",
                            \"unit\":+\"\"}],\"graphEvents\":+{\"Speed\":+[{\"UTCTime\":+1561626805892.99,\"index\":+\"1\",
                            \"Result\":+7}],\"Accuracy\":+[{\"UTCTime\":+1561626805775.99,\"index\":+\"0\",\"Result\":+3}],
                            \"Efficiency\":+[{\"UTCTime\":+1561626805775.99,\"index\":+\"0\",\"Result\":+3}]}}"
Step 3.1: Prepare levelPlannedParams Parameter
levelPlannedParams is a JSON file with workout session game settings.
This file enables you to send VR game settings to your application for this specific Workout session. Game settings can be different according to your needs. Examples: ‘Difficulty’, ‘Speed’, etc.
This field is a JSON that can have up to 7 settings parameters in a format of "{"Key": Value}".
Key - string size must be up to 25 characters - The key represents the actual setting definition that will be displayed to the end user.
Value - string size up to 15 characters.
JSON Example
                            {

                              "SpeedLevel": "0",

                              "SessionDuration": "8",

                              "Difficulty": "Basic"

                              "GameMode": "Enabled"

                            }
Here’s an example of how levelPlannedParams will be displayed in our Health Portal:

Step 3.2: Prepare resultData Parameter
resultData is a JSON with workout session results. resultData’s JSON consists of two parts - calculatedData and graphEvents. Each of the two parts represent different types of results our Health Platform can digest.
CalculatedData
calculatedData shows a session results summary. calculateData will contain the average results
for a session based on different calculated indicators. You will be able to send up to 5
results.
This JSON can have up to 5 objects in a format of "{"name":String, ”value”:String,
”unit”:String}".
JSON Example
                            {"calculatedData":

                             {

                               "name": "Score",

                               "value": "360",

                               "unit": ""

                             },

                             {

                               "name": "Speed",

                               "value": "12",

                               "unit": "m/s"

                             },

                             {

                               "name": "Success",

                               "value": "98",

                               "unit": "%"

                             },

                            "graphEvents": {...}

                            }
name - string size must be up to 25 characters.
value + unit - The sum of "value" and "unit" values can be up to 12 characters.
Valid JSON Example
                            {

                              "name":"hits",

                              "value":"60",

                              "unit":"times"

                            }
Invalid JSON Example
                            // Not valid! the sum of value and unit is more than 12 characters

                            {

                              "name":"hits",

                              "value":"123456789",

                              "unit":"0123"

                            }
Here’s an example of how CalculatedData will be displayed in our Health Portal:
graphEvents
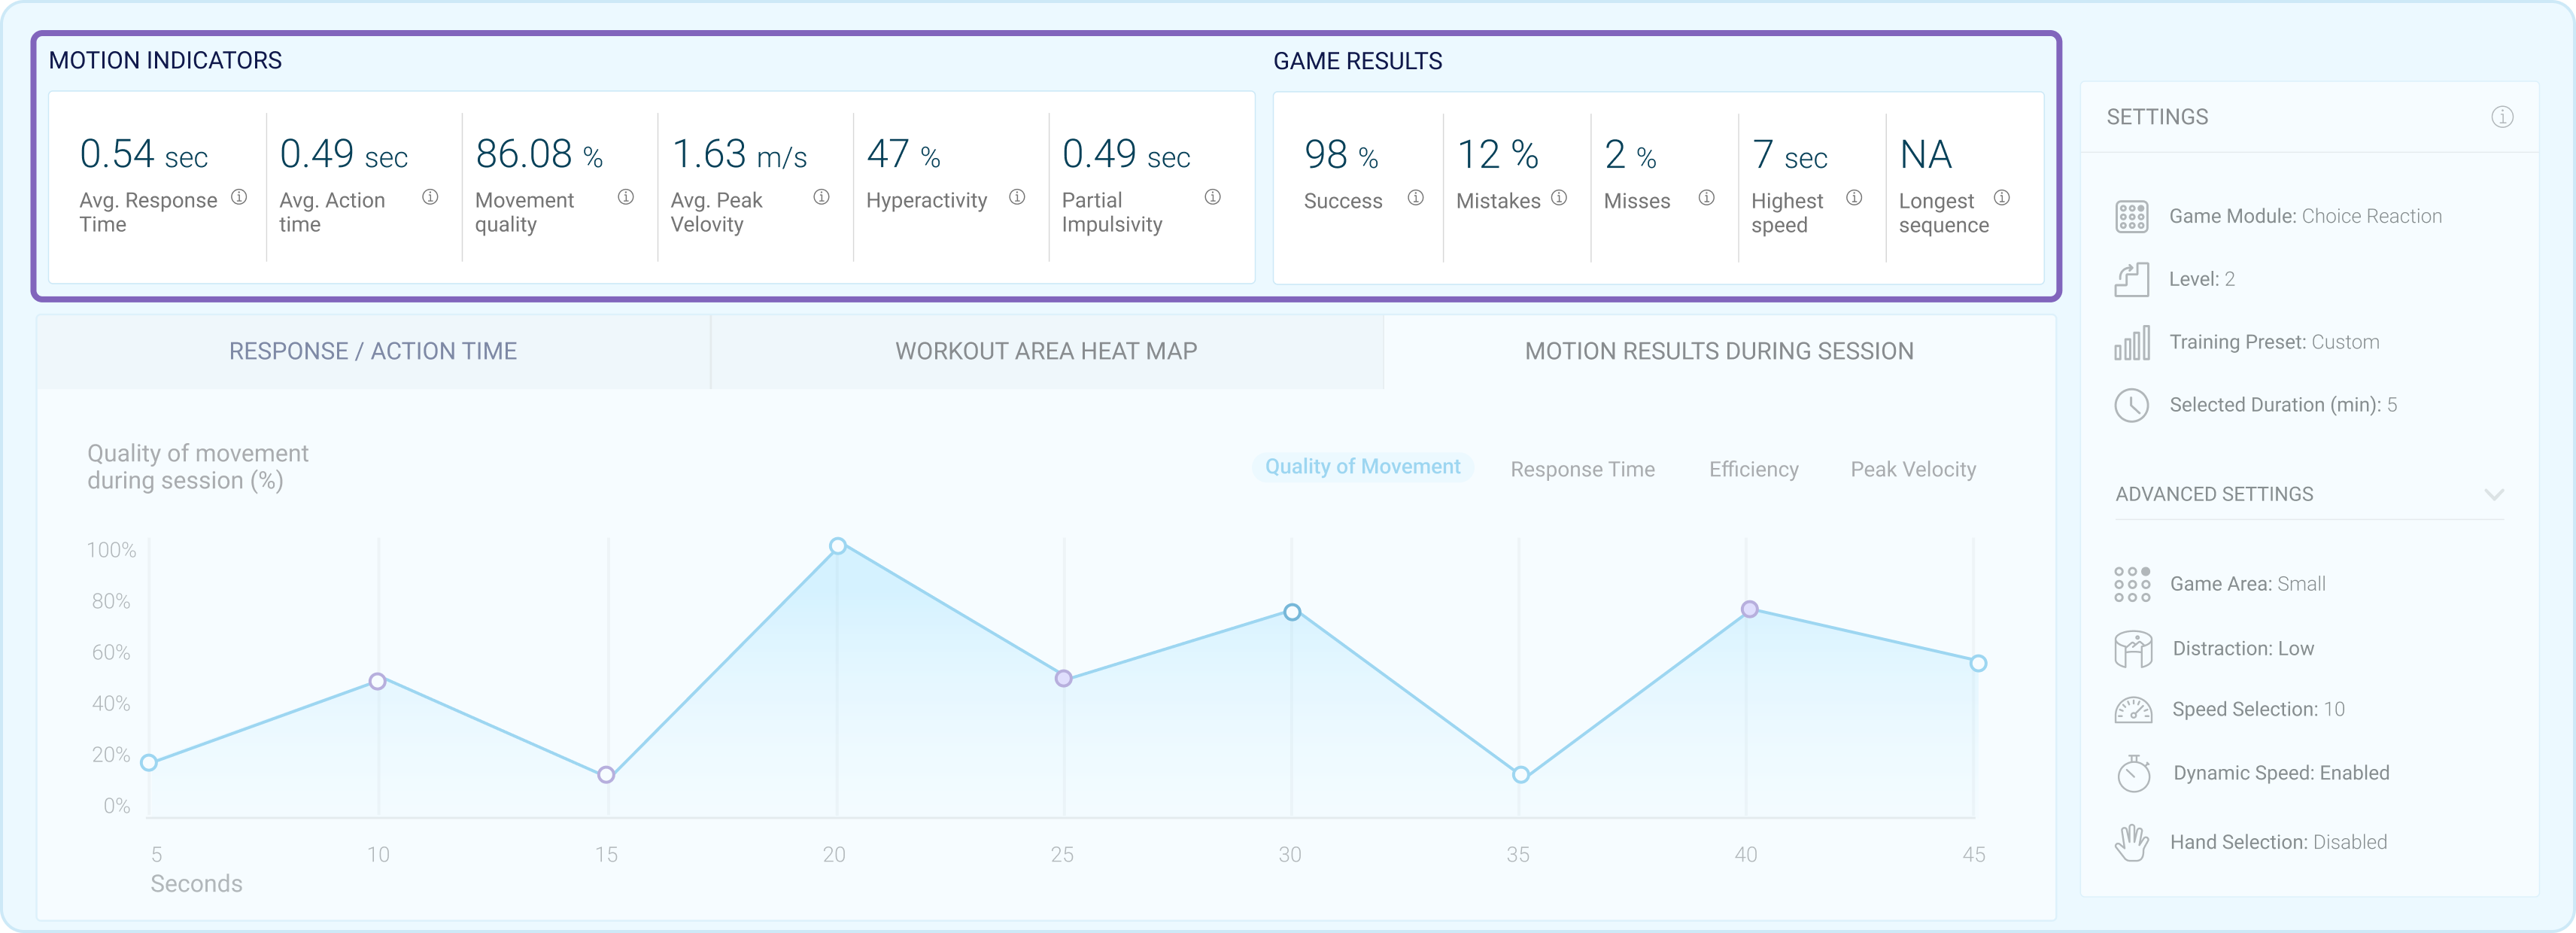
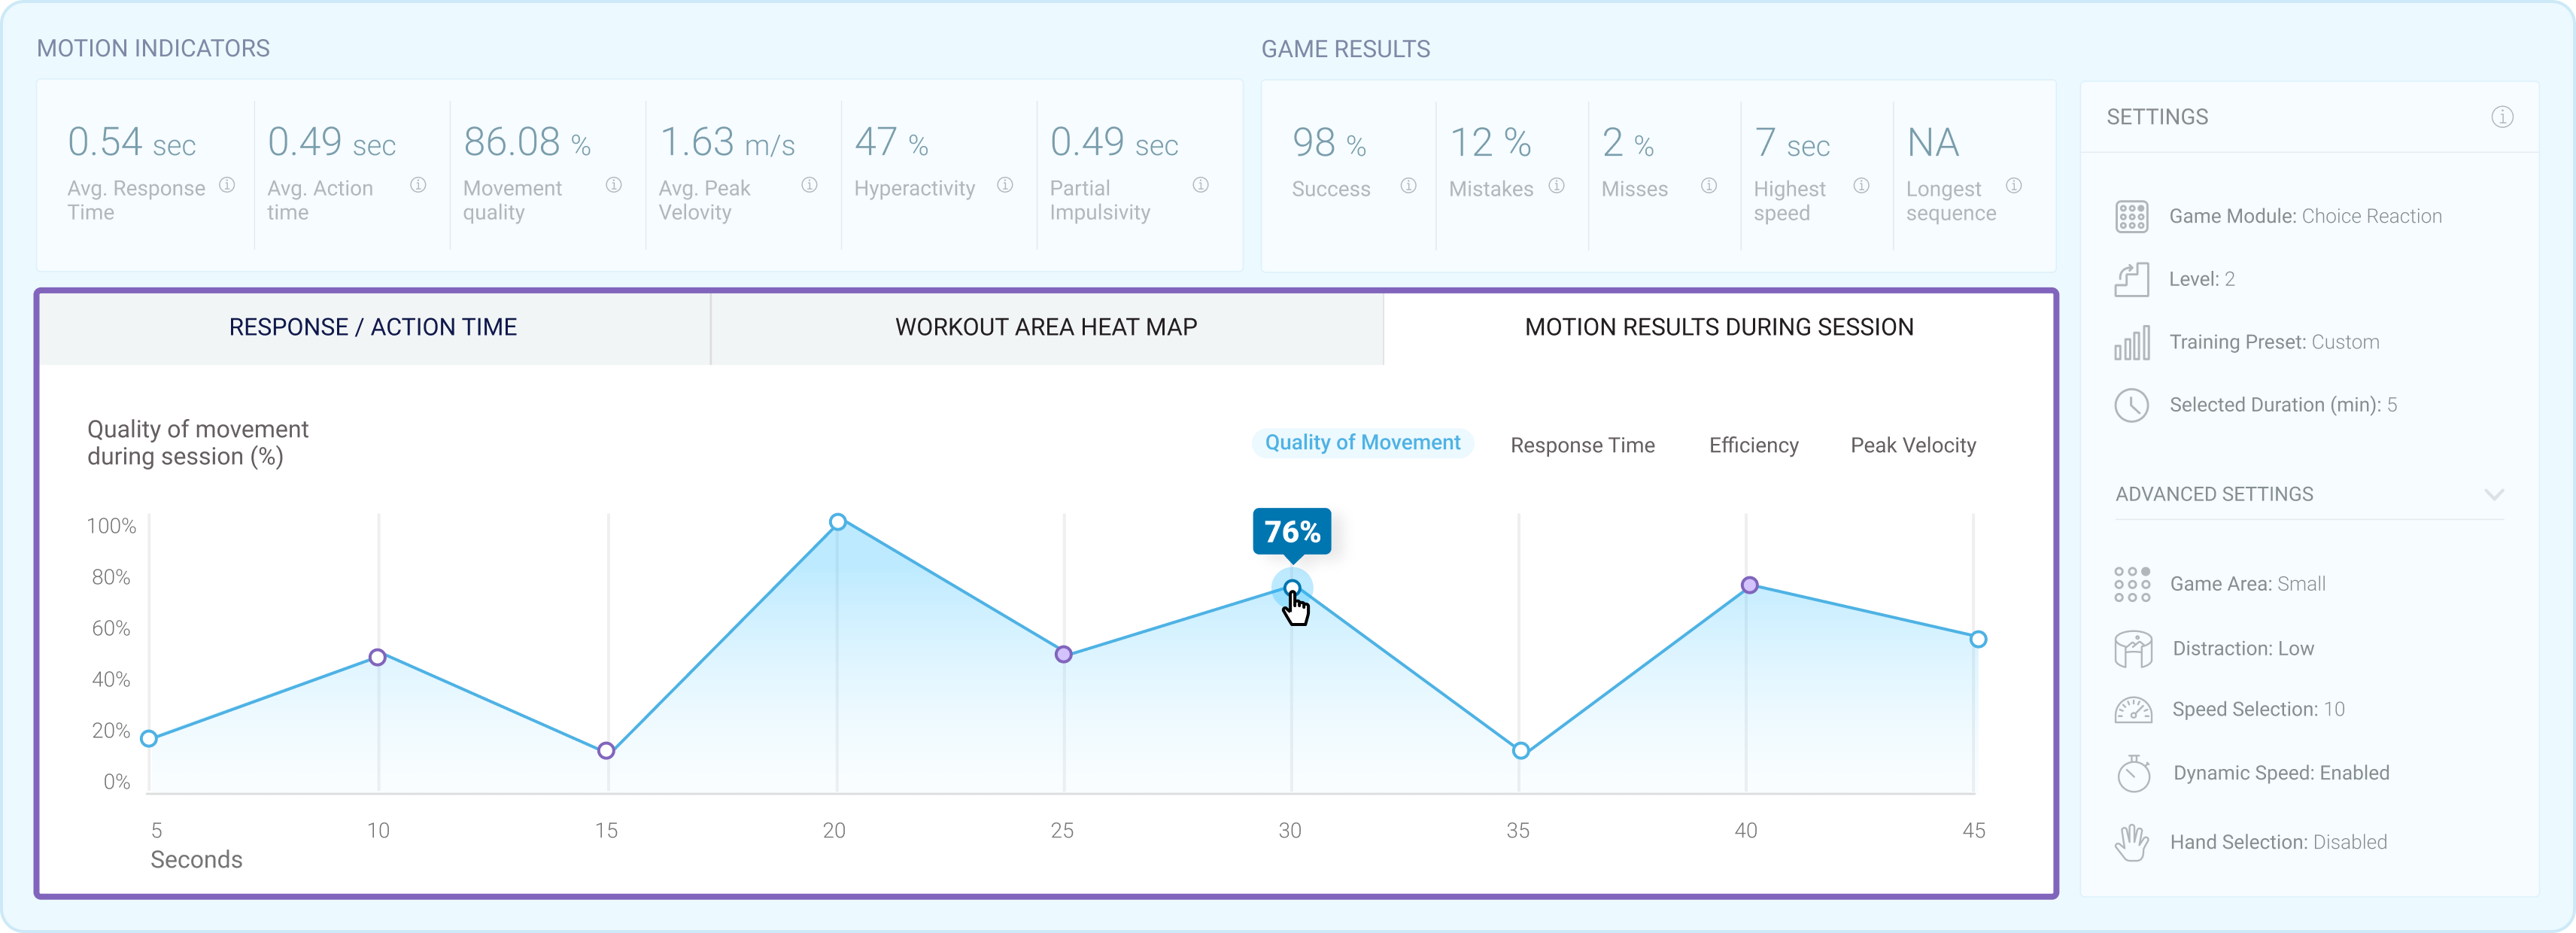
graphEvents shows the session’s results-progress for different game indicators. This graph enables you to send a result for different timestamps during the session and visualize it in our Health Portal. This JSON can have up to 5 graphs. Each graph has a “Name” and a list of event items, each of the event items is in a format of "{"UTCTime":String, ”index”:String, ”Result”:String}".
                            {

                             "calculatedData": {...},

                             "graphEvents": {

                               "Speed": [

                                 {

                                   "UTCTime": 1561626805775.99,

                                   "index": "0",

                                   "Result": 3

                                 },

                                 {

                                   "UTCTime": 1561626805892.99,

                                   "index": "1",

                                   "Result": 7

                                 },

                                 {

                                   "UTCTime": 1561626806758.99,

                                   "index": "2",

                                   "Result": 10

                                 }

                               ],

                               "Accuracy": [

                                 {

                                   "UTCTime": 1561626805775.99,

                                   "index": "0",

                                   "Result": 3

                                 },

                                 {

                                   "UTCTime": 1561626805892.99,

                                   "index": "1",

                                   "Result": 7

                                 },

                                 {

                                   "UTCTime": 1561626806758.99,

                                   "index": "2",

                                   "Result": 10

                                 }

                               ],

                               "Efficiency": [

                                 {

                                   "UTCTime": 1561626805775.99,

                                   "index": "0",

                                   "Result": 3

                                 },

                                 {

                                   "UTCTime": 1561626805892.99,

                                   "index": "1",

                                   "Result": 7

                                 },

                                 {

                                   "UTCTime": 1561626806758.99,

                                   "index": "2",

                                   "Result": 10

                                 }

                               ]

                             }

                            }
name - string size must be up to 20 characters.
UTCTime - Current UTCTime serves as a timestamp.
index - index in the structure is an incremental index for each timestamp.
Result - [Ask DUDU if there’s any limitation].
Valid JSON Example
                            {

                              "name":"hits",

                              "value":"60",

                              "unit":"times"

                            }
Invalid JSON Example
                            // Not valid! the sum of value and unit is more than 12 characters

                            {

                              "name":"hits",

                              "value":"123456789",

                              "unit":"0123"

                            }
Here’s an example of how GraphEvents will be displayed in our Health Portal:
Done! You have just integrated XRHealth
Extra Information
OAuth token validation
To validate token, use GET https://api.portal.consumer-dev.xr.health/api/sandbox/oauth/token/validate/{token} endpoint.
Headers
Parameters
Example
                            curl -X GET
                            "http://127.0.0.1:8000/api/sandbox/oauth/token/validate/MmFmMDA4OGRiMzUxZmQ0NmRjMGNmYmZiOGFkMmM3MTcxM2IyYjRiMjYyMzBkODk5MjU4YjhmMGQwMWNjNmY5ZQ"
Responses
                            Valid Responses (Ask DUDU)

                            Code: 200. JSON with:

                            {

                               "valid": true,

                               "message": ""

                            }

                            Code: 200. JSON with:

                            {

                               "valid": false,

                               "message": "User is already connected from a different device or invalid."

                            }
Errors
Code: 500. Returned when something happened wrong on the server side
{ "code": 0, "message": "string" }
New workout session
For saving new workout session results, use POST endpoint. curl -X POST "https://api.portal.consumer-dev.xr.health/api/developer/workout-sessions" endpoint.
Headers
Parameters
Example
                            curl -X POST "https://api.portal.consumer-dev.xr.health/api/developer/workout-sessions" \

                              -H "Content-type:\ application/x-www-form-urlencoded" \

                              -H "Authorization:\ Bearer\ accessToken" \

                              -d "duration=75" \

                              -d "epocStartTime=1561626806758" \

                              -d "score=5600" \

                              -d "levelPlannedParams={\"SpeedLevel\":+\"0\",\"SessionDuration\":+\"8\",

                            \"Difficulty\":+\"Basic\",\"GameMode\":+\"Enabled\"}" \

                              -d "softwareVersion=1.1.0" \

                              -d "resultData={\"calculatedData\":+[{\"name\":+\"Score\",\"value\":+\"360\",

                            \"unit\":+\"\"}],\"graphEvents\":+{\"Speed\":+[{\"UTCTime\":+1561626805892.99,\"index\":+\"1\",

                            \"Result\":+7}],\"Accuracy\":+[{\"UTCTime\":+1561626805775.99,\"index\":+\"0\",\"Result\":+3}],

                            \"Efficiency\":+[{\"UTCTime\":+1561626805775.99,\"index\":+\"0\",\"Result\":+3}]}}"
Valid Responses
(Ask DUDU)Code: 200. JSON with:
{ "id": 1111 }
Errors
Code: 401. Returned when user token was expired or invalid
{ "code": 401, "message": "string" }
Code: 403. Returned when user has no access to this action
{ "code": 403, "message": "string" }
Code: 409. Returned when request data invalid or empty
{ "code": 409, "message": "string" }
Code: 500. Returned when something happened wrong on the server side
{ "code": 500, "message": "string" }
How to get a list of saved workout sessions
For getting saved Workout Sessions, use GET https://api.portal.consumer-dev.xr.health/api/developer/workout-sessions endpoint.
Headers
Parameters
Example
                            curl -X GET "https://api.portal.consumer-dev.xr.health/api/developer/workout-sessions?limit=1&page=1&order=DESC" \

                               -H "Content-type:\ application/x-www-form-urlencoded" \

                               -H "Authorization:\ Bearer\ accessToken"
Valid Responses
(Ask DUDU)Code: 200. JSON with:
                            {

                             "sessions": [

                               {

                                 "id": 1111,

                                 "duration": 75,

                                 "levelPlannedParams": "{}",

                                 "resultsData": "{}",

                                 "softwareVersion": "1.1.0",

                                 "epocStarttime": "1561626806758",

                                 "score": 5600

                               }

                             ],

                             "total": 1

                            }
Errors
Code: 401. Returned when user token was expired or invalid
{ "code": 401, "message": "string" }